
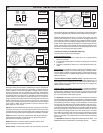
3.4
Owner's of the Schumacher Battery Charger SE-3000 gave it a score of 3.4 out of 5. Here's how the scores stacked up:
5
tery for about 5 minutes before cranking the engine.
5. If the engine fails to start, charge the battery for 5 more min-
utes before attempting to crank the engine again.
6. After the engine starts, move the charge rate switch to OFF
and unplug the AC power cord from the outlet before discon-
necting DC clamps.
Do not try to engine start a vehicle without a battery in it. You
may damage the vehicle’s system. If the engine spins, but doesn’t
start after several starting attempts, there is a problem with the
engine of the vehicle other than its starting system. STOP crank-
ing the engine until the other problem has been found and cor-
rected.
1. Set charge rate switch and timer to OFF positions. (No timer
on Model 2352.)
2. With the charger unplugged from the AC outlet, connect the
charger to the battery following instructions given in section
F.
3. Plug the charger AC power cord into the AC outlet, then move
timer from OFF to HOLD position.
4. Set the charge rate switch to the engine start position that
matches the vehicle battery and then crank the engine. Fol-
low the duty cycle printed on the front panel of your charger
for proper ON / OFF times. During extremely cold weather
or when the battery is severely exhausted, charge the bat-
NR NR NR NR NR
Determine the charge level of your battery with a hydrometer or electronic percent of charge tester. Determine the ampere hour rating of your battery. It
may be on the battery information label. If the battery is rated in Reserve Capacity, convert to ampere hour rating using the following formula:
Ampere Hour rating =
(Reserve Capacity) + 16 Example: AH rating = (168 Reserve Capacity) + 16 or AH = 100
(2) (2)
"Reserve capacity is in minutes"
Use the following formula to determine the time of charge required: (AH x % of charge needed) divided by amp setting of the charger, times
1.25 = hours of charge: Example: State of charge of the battery is 50%
Percent of charge needed is 100% - 50% = 50% (.50 decimal)
Ampere rating of the battery is 100AH
Charger setting is 10 amps
100 x .50 = x 1.25 = 6.25 hours of charge needed
10
+ 1.00 hour more if charging a deep cycle battery
7.25 hours total for a deep cycle battery.
A hydrometer reading of the specific gravity of the electrolyte (fluid) of the battery in good condition should be between 1.25 and 1.28.
When a battery reaches 80-85% of full charge, bubbles will appear on the surface of the fluid. As the battery nears full charge, bubbling will become
more vigorous.
K. BATTERY CHARGING
NOTE: These battery chargers are not automatic and can
overcharge a battery if permitted to operate for ex-
tended periods of time. Monitor the charging often.
Also, your charger may exhibit a noise (buzzing)
during charging. Laminations of the transformer
tend to vibrate. This is normal...continue to charge
the battery. The noise may continue after charger
is disconnected from battery.
CHARGER MUST BE ASSEMBLED BEFORE USING.
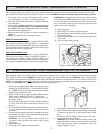
1. Before charging any battery, make sure the electrolyte (battery liq-
uid) in each cell is at correct level.
2. Set all switches and timers to the OFF position. (Model 2352 does
not have a timer.)
3. If the battery is being charged inside the vehicle, use connection
procedures outlined in Section F. Should the battery be removed
from the vehicle, follow the instruction in Section D, step 6 and
Section G. Plug the power cord into the AC outlet.
4. Set the charge rate switch to the desired charge position. See Charge
Rate Charts.
5. Set the timer from OFF position to desired timed charge, 30-135
minutes.
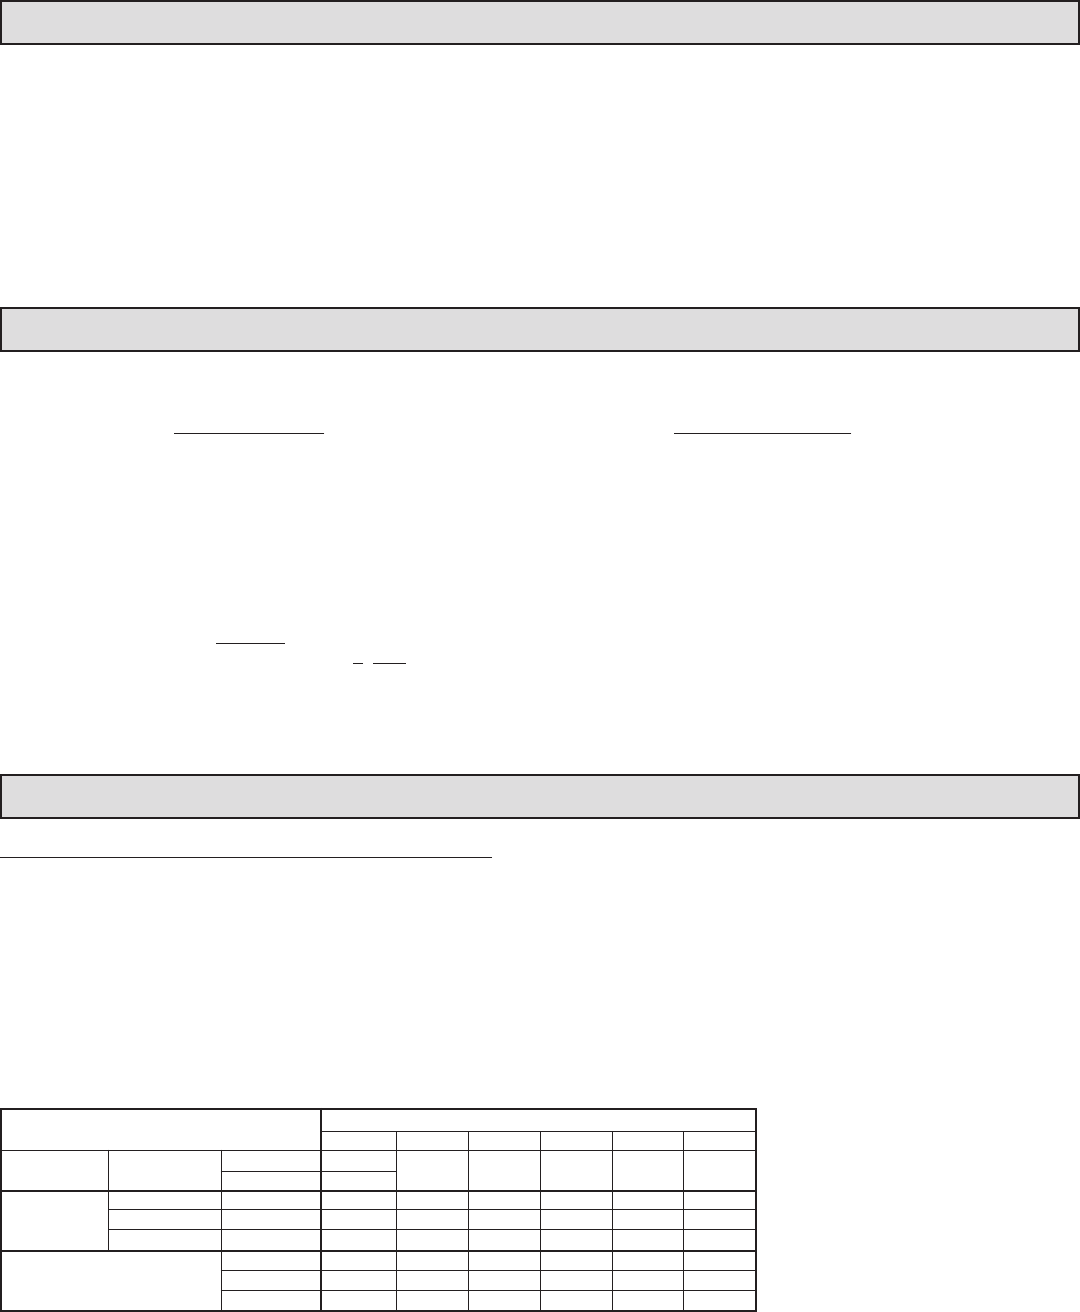
*Charge Rates for this model are listed on the
front panel.
**Based on battery at 50% charge.
AH Ampere Hours
NR Not Recommended
CCA Cold Cranking Amps
RC Reserve Capacity
MC Marine Capacity
I. ENGINE START
1. Charger need not be plugged into AC outlet. Timer should be in the
Off position, 6v/12v switch in position to match battery being tested,
and then connect following instructions in Section F.
2. Observe the meter indication. Keep in mind that this reading is only
a battery voltage reading, a false surface charge may mislead you.
We suggest that you turn on your headlamps for a couple of min-
utes before you read the meter. Read a couple of minutes after you
have shut the headlamps off, then follow the convenient color code
of the meter.
J. CHARGE PERIOD
SMALL
BATTERIES
CAR/TRUCKS
MARINE/
DEEP CYCLE
BATTERY SIZE/RATING
CHARGE RATE*/CHARGING TIME - HOURS**
2 AMP 10 AMP 30 AMP 35 AMP 50 AMP 60 AMP
Motorcycle, Garden 6 - 12 AH 1.5 to 3
Tractor, etc. 12 - 32 AH 3 to 8
200 - 315 CCA 40 - 60 RC 11 to 15 2.5 to 3 .75 to 1 .5 to .75 NR NR
315 - 550 CCA 60 - 85 RC 15 to 18 3 to 4 1 to 1.5 .75 to 1 .5 to .75 .5 to .63
550 - 875 CCA 85 - 125 RC 18 to 25 4 to 5 1.5 to 1.7 1 to 1.5 .75 to 1 .63 to .75
55 MC 15 4 NRNRNRNR
80 MC 19 5 2 1.75 NR NR
105 MC 23 6 2.5 2 NR NR


Find Your Products By Category
Please Login
