
3.5
Owner's of the Makita Saw 5007F gave it a score of 3.5 out of 5. Here's how the scores stacked up:


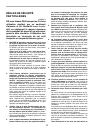


7
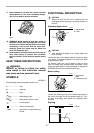
For straight cuts, align the A position on the front of the
base with your cutting line. For 45° bevel cuts, align the B
position with it.
Switch action
CAUTION:
• Before plugging in the tool, always check to see
that the switch trigger actuates properly and returns
to the “OFF” position when released.
To start the tool, simply pull the switch trigger. Release
the switch trigger to stop.
Electric brake
For model 5007FA, 5008FA only
This tool is equipped with an electric blade brake. If the
tool consistently fails to quickly stop blade after switch
trigger release, have tool serviced at a Makita service
center.
The blade brake system is not a substitute for lower
guard. NEVER USE TOOL WITHOUT A FUNCTIONING
LOWER GUARD. SERIOUS PERSONAL INJURY CAN
RESULT.
Lighting the lamp
CAUTION:
• Do not see the source of light directly.
• Always be sure that the lamp is switched off when
you do not use the tool.
To turn on the lamp, press the “ON” side of the lamp
switch. Press the “OFF” side to turn it off.
ASSEMBLY
CAUTION:
• Always be sure that the tool is switched off and
unplugged before carrying out any work on the tool.
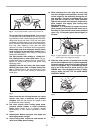
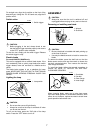
Removing or installing saw blade
CAUTION:
• Be sure the blade is installed with teeth pointing up
at the front of the tool.
• Use only the Makita wrench to install or remove the
blade.
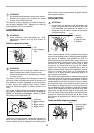
To remove the blade, press the shaft lock so that the
blade cannot revolve and use the wrench to loosen the
hex bolt counterclockwise. Then remove the hex bolt,
outer flange and blade.
To install the blade, follow the removal procedure in
reverse. BE SURE TO TIGHTEN THE HEX BOLT
CLOCKWISE SECURELY.
When changing blade, make sure to also clean upper
and lower blade guards of accumulated sawdust. Such
efforts do not, however, replace the need to check lower
guard operation before each use.
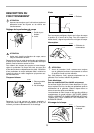
1. Switch trigger
1. Lamp switch
1
001396
1
001411
1. Wrench
2. Shaft lock
1. Saw blade
2. Hex bolt
3. Outer flange
4. Inner flange
1
2
001417
4
1
3
2
001434


Find Your Products By Category
Please Login
